Monday, August 29, 2016

Back to School Healthy Lunch Blog Challenge


My child is only in preschool and I already feel like I have lunch fatigue. Luckily I found these containers one day while tooling around amazon and they have really stepped up my lunch game. There is something about all the little compartments that inspires me to try lots of different foods. And I think toddlers respond well to lots of different choices and shapes and textures. The winner in this lunch was definitely the onigiri (better known in my house as sushi balls!!!) As per wiki- onigiri is a Japanese food made from white rice formed into triangular or cylinder shapes and often wrapped in nori.   


My three year old loves sushi. This still cracks me up because I didn't even know what sushi was until I was in college. The problem with a three year old eating sushi however, is that an unfortunate amount of it ends up on the floor. Lately, he pulls the nori out and discards too which invariably sends rice flying everywhere. So while I've known about onigiri for awhile and their prevalence in adorable bento- I've never made them before. But then one night I suddenly had a moment of inspiration when it occurred to me that they were essentially sushi in a smaller easy to eat portion with no nori (at least wen I made them...) So I made some sushi rice and seasoned like normal then dumped in some random chopped up veggies and fish and rolled them into little balls. Honestly I liked them too- it was way faster than making sushi. (Sushi was one of my pregnancy cravings with this son and I got pretty adept at making it as a result)  


Little Veggie Onigiri Balls


1 cup sushi rice

carrots, broccoli and/or whatever veggies you have around/ kid likes

tuna 

1 tbs rice wine vinegar

1 tbs mirin (or sugar) 

pinch salt

small cucumbers and/or furikake seasoning

Prepare your sushi rice as instructed. I have tried lots of ways of doing this and honestly haven't loved any of them. The only thing that I think is essential is soaking and rinsing your rice well before cooking. When the rice is done cooking turn off the heat and add the vinegar, mirin and salt. (Sugar is traditional I just started using mirin because I didn't want to add sugar it also saves you from having to dissolve the sugar in the vinegar.) Stir gently and let cool a bit. Meanwhile steam and chop whatever veggies you are using to smallish pieces. I used the food processor, just leave a bit of texture. (I also used leftover veggies so I didn't steam them first.) If they are freshly steamed you may want to squeeze out a bit of water and then add them to the rice. Strain some tuna (I used a nice canned variety- if I was making this for adults I might spring for some sushi grade tuna and put it on top, but that seemed excessive for a little kid.) I didn't include amounts for the veggies and fish, because it's entirely up to you. You just need enough rice for it to stick together. Other than that it's a matter of taste. Stir everything together, pinch of bits and roll them into balls. Having slightly wet hands will help stop the rice from sticking to you as much. I got impatient and made them more like two biters, but I found the smaller the better where the toddler (and the mess) were concerned. I stuck both cucumber slices and some furikake seasoning on top, but they were good without too. Next time I want to experiment with a brown rice variety- I almost never eat white rice anymore and not only to I like the health benefits of brown rice, at this point I like the taste better too.    

This post is an entry in the Back to School Healthy Lunch Blog Challenge hosted by Friends of Great Kids Farm. Friends of Great Kids Farm is a 501(c)3 foundation partner to Baltimore City Public Schools' Great Kids Farm. Friends financially supports, enhances, and promotes the Farm's experiential gardening and nutrition education and career training programs to benefit as many of Baltimore City Schools' 85,000 students as possible. In 2008, an overgrown, unused property owned by City Schools was transformed into a working farm and dynamic outdoor classroom. This unique facility now provides: a working farm where students connect with healthy foods through cross-curricular, hands-on learning activities; fresh produce for school cafeterias and nutrition education programs; a professional kitchen where students cook and taste Farm produce guided by a chef educator; classrooms for healthy food demonstrations and tastings linked to core instruction; internships for high school students in agriculture and the culinary arts; and support for the development of schoolyard gardens throughout the district. The Back to School Healthy Lunch Campaign seeks to bring attention to healthy eating and support innovative education with local creativity.    

Find more info, other healthy lunch ideas and fun printables at: http://www.friendsofgreatkidsfarm.org/back-school-healthy-lunch-campaign


Friday, June 27, 2014

#babyfoodstuffs

Baby coconut and blueberry (cooked) mousse 

So I'm trying to post from my phone which I've never done before and may or may not work (but seems likely to increase my typo count...) And since I'm about ten years behind the trend I'm blogging about Instagram! Yeah guys its this new thing try it out! Yeah so better late than never although I still don't entirely understand it or proper hash tag protocol. The thing I've mostly been instagramming oddly enough is baby food. This somehow seems way more hysterical than grown up food to me but I'm not doing it to be a hipster (pretty sure I missed the boat on that one...) but because it helps me keep track of combinations and stuff he likes. I make all my baby's food which I'm always hesitant to admit in groups of other mommies because I'm afraid to sound judgmental, but yeah I do. I like to cook, actually find it easier than packing up the baby and traipsing to the store all the time and I like to be able to control ingredients, quality and seasoning. I freeze everything into 1 oz cubes and then combine them in various successful and not so successful ways. Daddy likes to call them nutrient cubes which has kind of stuck. I feel strongly about using spices which I started doing around 7 months ish (treating them like anything else new and waiting three days to see if there was a reaction after each one) So I started doing this as a record for myself but since I like browsing other people's recipes and combinations I thought is let everyone know that I've tagged everything with #babyfoodstuffs if you want to check it out. (Also I'm not being cute about my Instagram confusion-- I'm not entirely sure if you can see them or need to follow me or what, but I'll find a teenager to explain this to me at some point) Also please feel free to tag your own creations I'd love to see them!

Homemade ricotta with raw blueberry purée and cinnamon 

Homemade brown rice (ground in a coffee grinder and cooked w/ water for ten minutes) black beans, sweet potato, caramelized onion, cumin and cilantro.

This is a big fave lately, and by puréeing the rice and beans together (and freezing them that way) it avoids the rubbery disk of rice that happens if it goes into the fridge straight up. 

Please follow your pediatrician's advice about feeding, allergies and ingredients--this is only for inspiration and is not medical advice.

Thursday, June 12, 2014

all the fabrics

So I recently discovered Spoonflower.com (or rediscovered it anyway) and if you're a fabric hoarder like myself, you're going to want to check it out. So. much. fabric. Seriously I think I have 60 designs in my cart right now. (I can't really buy that many right??) Anyway I've become somewhat obsessed with fabric design as a result, which makes sense as I'm an artist/ designer and fabric junky... not really sure why I never thought of it before. I set up a shop (added a link on the sidebar) and while nothing is for sale quite yet it will be shortly. (Shortly in mommy time seems to take longer than it used to fair warning) I also entered their "Cosmic Voyage" contest because I am a giant space nerd and to my delight made the semifinals. So if you are so inclined I would be honored if you voted for me! 
http://www.spoonflower.com/contest_voters_temp/new?contest_id=256 You have to scroll through all the designs, but you don't need to register or anything annoying like that. (My fabric is called Orion's Star Map) 


I also designed some bibs on cafe press- I haven't listed them for sale though because the terms seem to indicate that they take possession of the artwork- does anyone have any experience with them? And perhaps someday I'll actually start selling things in the etsy shop I opened years ago instead constantly buying things... sigh. 

Sunday, January 26, 2014

So that happened....

It's been quiet around Made From Scratch lately, and there are several reasons I'll get into later... but the cutest one is my 4 month old son. I found out I was pregnant right after New Years 2013 and he was born in September. I now have both more and less free time somehow... and I'm still not sure how exactly it will affect this blog, but I guess we'll find out. I made a ton of crafts and projects for him and the nursery, some of which I'll try to share/ link to below. I did a kind of modern woodland thing which seemed to get really popular right after I finished everything. I blame that stupid fox song. (which you are now singing in your head... sorry) Oh well, it's still cute. I was inspired initially by this fabric, but ended up barely using it in the room and went way more mod. 


The walls are a grey/blue/green that was strangely inspired by the industrial tile the bathroom at work. I know that's weird, but I love the color especially against the deep orange. I knew I wanted to paint a mural, but I didn't want the small room to feel cramped and busy so I kept it really minimal. I just looked at some clip art and sketched it right on the wall (I'm a drawing professor and that sort of thing doesn't intimidate me, but you could scale up clip art too if you weren't comfortable free-handing it.) One of my favorite things about the mural (murals really because the main bit with the fox is one one wall and there are two hedgehogs and a squirrel on other walls) is the fabric decals. I came across this clipart while pondering what to draw and while I didn't buy or use it, I liked the idea of incorporating fabric patterns and used this super easy tutorial to do it. I used the fabric in addition to paint to add some pattern, but it would also be a great for people who can't or don't want to paint on the walls. The little fox pillow is from an Ed Emberley cut and sew panel. The blanket is just a crochet ripple stitch (didn't use a pattern.)

The mobile is little felt animals I stitched up and hung from branches. Again no pattern I just sat down with a pile of screw eyes and some sticks and fiddled with them until it hung nicely. It honestly took longer than I anticipated and I had to move the screw eyes around a bunch. The trick is to use a screw starter to get them to go in easily. I'm glad I made it because Mr. O loves to stare at it and lately I swear he's started talking to it.

Toy chest/ bench is an old trunk I had that I made a cushion for. I got an amazing deal on the foam from amazon and I just went to link to it but the price has gone from $12.99 to $89.99 so I guess maybe that was a little too good to be true... The art above it is an old painting of mine and prints by Melissa Moss that I've had for years. (She doesn't seem to have them listed currently.) Made the pillows, and the aforementioned hedgehogs.  

The forest print is one I've had for years that some relative of mine made, the deer print was a gift, the log I painted, the mountain print and the clock I made from mat board of all things. I was going to get plastic laser cut at work, but by 8 months pregnant I really didn't ever feel like leaving the house. So I cut it out of matboard and bought a clock kit from the craft store. (I spray painted it orange) It was really tedious and I had to sand all the edges a million times, but I kind of love it. 

The little rocking chair was once mine- I just painted it orange. I made the crib skirt- its three pieces of fabric sewn to muslin.


I just put a changer on top of an ikea dresser because that seemed more practical, and added the open shelving because there wasn't much closet space and baby clothes are cute so why not display them? It gave me more room for toys and diapers too.
 
 Awesome yeti tutorial. The elephant is another old toy of mine sprayed orange.

Adorable animal jar lids all over pinterest. And hat made from this tutorial

Ikea expedit bookcase on its side with vintage lamps. I bought four of the cheapest cubes I could find and coated them with spray adhesive and covered them with fabric. It was an awesome way to incorporate more fabric and was actually cheaper then making them. I made the pillow on the chair and the fleece is also from Ikea.


Needle felted monkey riding a dinosaur because... why not? Saw something similar on etsy and said, "I can make that!" Then I did.

Taggie dino and quilt- I went nuts with the orange and gray fabrics for this and we use it as a play mat all the time.

Close up of the chair- I really wanted a fancy new chair, but it wasn't in the budget and I had this old rocking chair that had been in my nursery as a child sitting on my porch so I finally conceded to use it at the last minute-- if we painted it. I love how it came out. It started out 70's brown and gold with floral appliques and its now shiny gray with white rustic animal stencils. I did this at 9 months. Nothing like waiting for the last minute...

Full shot of the mural. 


Thursday, December 27, 2012

happy holidays


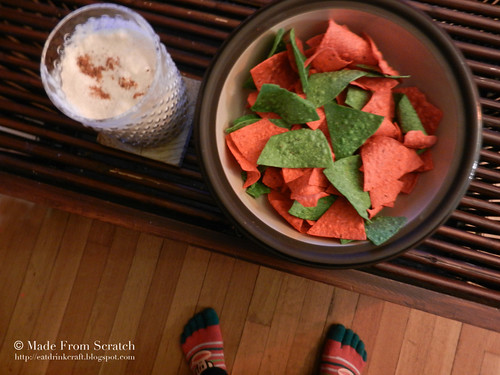
White Christmas. Holiday Inn. Christmas in Connecticut. I love Christmas movies. The Hallmark/Lifetime movies are in constant rotation this time of year (much to the dismay of a certain gentlemen...) This is the xmas edition of my usual wine and popcorn movie snack- milkless eggnog and holiday chips. (Milk/cream/ etc. do bad things to me.) The chips admittedly I just poured into a bowl, but the eggnog is made from scratch and full of bourbon. And rye. And cognac. I think I like more booze in my eggnog than most. And I wore my creepy holiday monkey toe socks!

Milkless Eggnog

4 eggs separated 
1/3 cup grade b maple syrup (i always use b I think it has more flavor) 
1 1/2 cups dairy free milk (I used lactaid, but soy or almond would work too)  
1 cup coconut milk solids (just scoop out the thick part not the watery stuff)
pinch of salt
2 cups of bourbon, rye and cognac in whatever proportion you prefer
Whisk the egg whites in a mixer at high speed until they reach soft peaks. Reduce to medium and add half of the maple syrup. Beat until incorporated and transfer to another bowl. Put the yolks and the rest of the syrup in the bowl and beat until they are quite pale yellow and hold "ribbons" ie is thick enough to hold its shape when drizzled, about 2-3 minutes. Pour the non-dairy milk into a measuring cup and then scoop in the coconut cream until it displaces the milk up to 2 1/2 cups. (The cream is thick enough that it can be tricky to measure) Add the milk/coconut mixture, salt and hooch and mix on low until incorporated. Fold in the egg whites and ladle into glasses. Sprinkle with nutmeg. Yum. 

Friday, March 30, 2012

the best chocolate mug cake. no seriously.


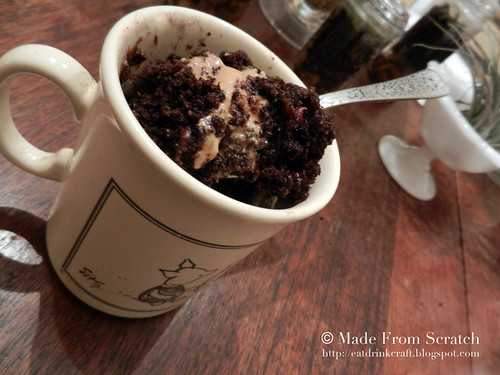
I have been collecting/hoarding "mug cake" recipes for years now and have tried a bazillion of them. Seriously. Years. I have folders full of them online and in real life. They seem like such a brilliant idea, except they are so often rubbery and disappointing. They almost always contain a whole egg which seems seriously problematic to me... I mean an entire batch of cupcakes has one or two eggs in it-- why would one small serving need a whole egg? It makes the cake way too spongy. However using an 1/16 of an egg isn't practical so I started looking specifically for egg-less mug cake recipes. I found one on a health blog of all places... and proceeded to disregard most of the proportions completely, increasing the fat and decreasing the sugar significantly. It was almost perfect, but still a little dry. Then I had a stroke of genius. I buried a spoonful of peanut butter in the batter before I cooked it. The peanut butter becomes molten with cooking and makes the cake super moist. Then I tried it with caramel sauce (mine was homemade but tj's has a nice salt caramel sauce that I've used as well) also awesome. Strawberry jam. Yum. If you wanted to be really crazy you could put a spoonful of nutella in there. Peanut butter is still my fav, but I like the option to change it up and experiment. Speaking of which. I most often make this cake with almond milk. It started because I was out of milk and it was my only option. (I make almond milk all the time- its so good) I'm not sure if it's my imagination or not, but I've convinced myself that the almond milk in this recipe tastes better than regular milk although it works fine with both. I've also tried buttermilk with didn't seem to alter the flavor at all so being as its more expensive I don't bother with. I've substituted brown sugar and maple for the white sugar with no noticeable effect, and frequently sub barley or whole wheat flour for the AP. (Often half and half, although a full swap works fine) A pinch of cinnamon is nice, I didn't find vanilla altered the flavor much. I've tried olive oil in place of the veggie and again I didn't think it was worth the expense. Don't leave the pinch of salt out it's key. I should also mention that this cake is small. It's more like half a mug. You can double it and I have, but I find this to be exactly the amount I want to eat when I come home from work late at night exhausted and in need of warm cake. Mmmm warm cake. This and a glass of red wine is pretty much the best pb& j ever. I always make it in my goofy piglet mug which is child sized. (No idea where it came from now that I think about it...) but it would also fill a ramekin nicely. If you double it remember to cook it a little longer. It's also not very sweet which I prefer, especially with the sweeter fillings, but feel free to increase the sugar to taste.


Chocolate Peanut Butter Mug Cake


2 tablespoons flour (I often use 1 T AP and 1 T barley flour)
2 teaspoons of sugar (or to taste)
2 teaspoons unsweetened cocoa powder

1/4 teaspoon baking powder

Pinch salt
2 tablespoons milk (or almond milk, my fav.)
1 tablespoon oil

handful of mini chocolate chips

1 Tbs peanut butter (or caramel, jam, nutella, almond butter, etc)

In a small mug combine the flour, sugar, cocoa powder, baking powder and salt until no lumps remain. Stir in the milk and oil until smooth. Make sure to scrape your fork around the edges of the cup so you don't get pockets of dry flour. Mix in the chocolate chips. Drop the peanut butter into the chocolate mix and push it down to submerge.
Bake in the microwave on high for 1 minute. You may need to add or subtract 5-10 seconds depending on your microwave, but don’t be tempted to overcook or it will be dry. It should still be moist on the bottom and will continue cooking as it sets. (In my microwave its 1:04 exactly.)

Monday, October 31, 2011